Little Red Riding Hood Cloak Tutorial


As promised here is the Red Riding Hood Tutorial. This cloak was pretty tricky for me and I spent weeks thinking about it. Then I spent days cutting paper out, trying to figure out just how I was going to make this work. But eventually with some luck and guess work I got it. It turned out just as I had planned.
Here's how to make your own Little Red Riding Hood Cloak.
MATERIALS:
1. 1/2 yard Red Costume Fabric (I got glitter Satin)
2. 1/2 yard Lining Fabric (I got Damask Chili Pepper & White)
3. Button
4. Elastic
5. Sewing materials
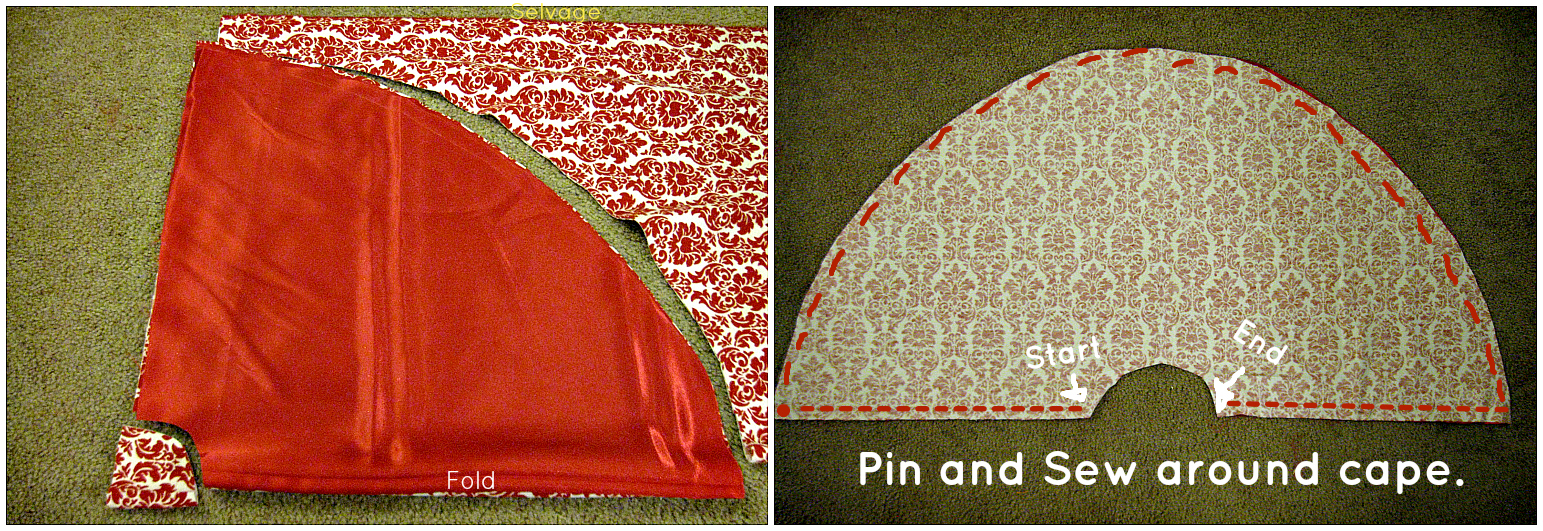
First we'll start with the cloak or cape.
STEP ONE: Fold your fabric (right sides out) in half, pin selvage together. Pin down a piece of string at the bottom edge of folded side. Attach the other side of the string to a pencil or fabric chalk. Decide how long you want your cloak to be, use the string to guide your circle, that many inches out. Cut fabric.
I wanted my cloak to be on the shorter side, so I made mine 18".

STEP TWO: Do the same thing for the top circle. Measure and cut.
I did mine 3".

STEP THREE: Repeat for the lining fabric.
Or you can use your already cut out fabric as your guide.
STEP FOUR: With right sides together pin and sew around cape.
Leave the opening of the cape unsewn.
STEP FIVE:After cape is sewn, clip around all the round edges, so they'll be able to move.
Turn right side out and iron.

Time for the Hood.
STEP SIX: With your fabric on the fold, cut out the hood.
These are the measurements I used. The longest angle I tried to curve so it wouldn't be so pointy. But it was still quite pointy. Try a harder curve at the top, for less point.

STEP SEVEN: Pin each hood together with right sides together, one at a time. Sew up the longest (curved) side.
.JPG)
STEP EIGHT: Turn each hood to it's right side and place the lining hood inside the outside hood. Line up the seams. Pin and sew around the sides and front of the hood.

STEP NINE: Push the lining hood into the outside hood and press.

This next step is tricky. You need to attach the hood to the cloak.
STEP TEN:Turn hood and clock inside out and pin the outside fabric cloak to the outside fabric hood. Pin the inside fabric cloak to the inside fabric hood. Leave an opening so you can turn it all right side out at the end.

STEP ELEVEN: Before you sew around, pin in some elastic to be used for the button. Then sew around making sure you're attaching the hood to the cloak.

STEP TWELVE: Turn everything right side out, through the opening you left. Hand sew the opening closed.

STEP THIRTEEN: Attach button to the other side of the cloak.

All done!
.JPG)
To Grandmother's house we go.


Click here to see the Big Bad Wolf tutorial.


Comments
Kelly,
Smart! School {House}
www.smartschoolhouse.com
I couldn't resist pinning you. Enjoy your weekend.
Cheers!
Carla